In this video, we’re diving into the advanced capabilities of the “AI Prediction node”. This node is a game-changer for training the e! AI, enabling it to offer predictive answers directly to your clients. Here’s how to harness this powerful feature:
Step 1: Integrating the Prediction Node
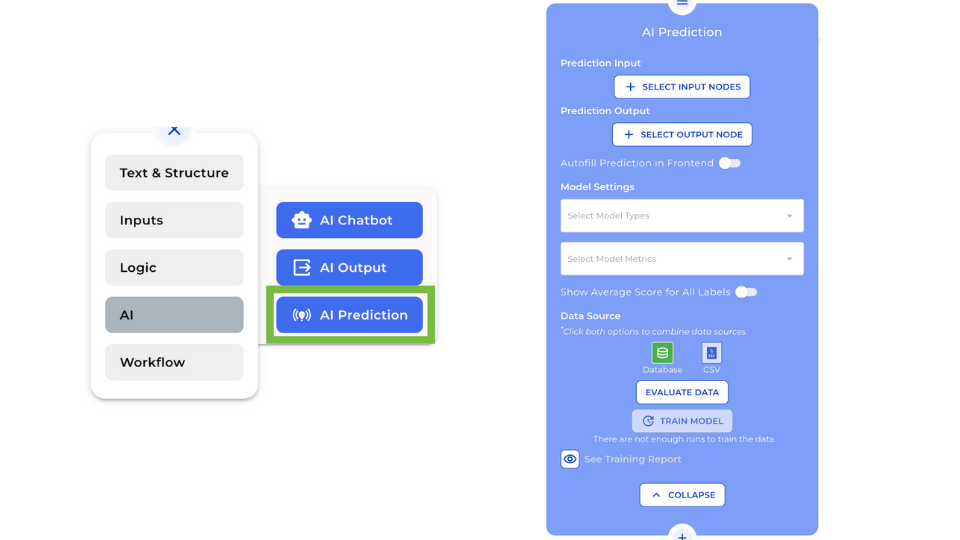
Start by adding the Prediction node to your bot. It’s simple, just navigate to the AI section in the “X” menu and select the Prediction node to place it on your canvas.
Step 2: Selecting Input Nodes
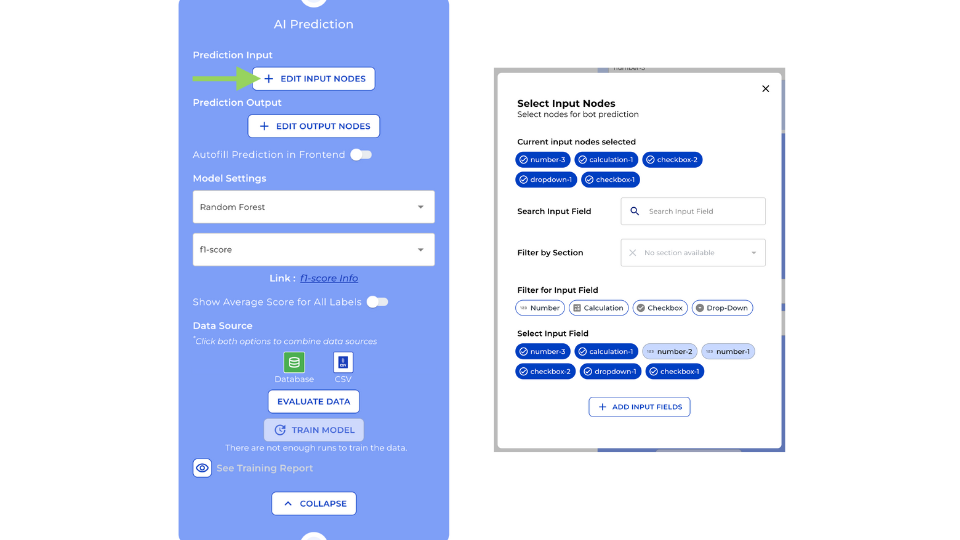
Click the “Select input nodes” button. A list of your bot’s input nodes pops up, allowing you to choose from Checkbox, Dropdown, and Number types. These selections are crucial for feeding relevant data to your AI.
Step 3: Configuring Output Nodes
Ensure you’ve added your desired output nodes before setting up the Prediction node. Remember, the output nodes, always must be positioned after the AI Prediction node. Click “Select output nodes” to see a list of these nodes, again limited to Checkbox, Dropdown, and Number types, and pick those you want the AI to predict.

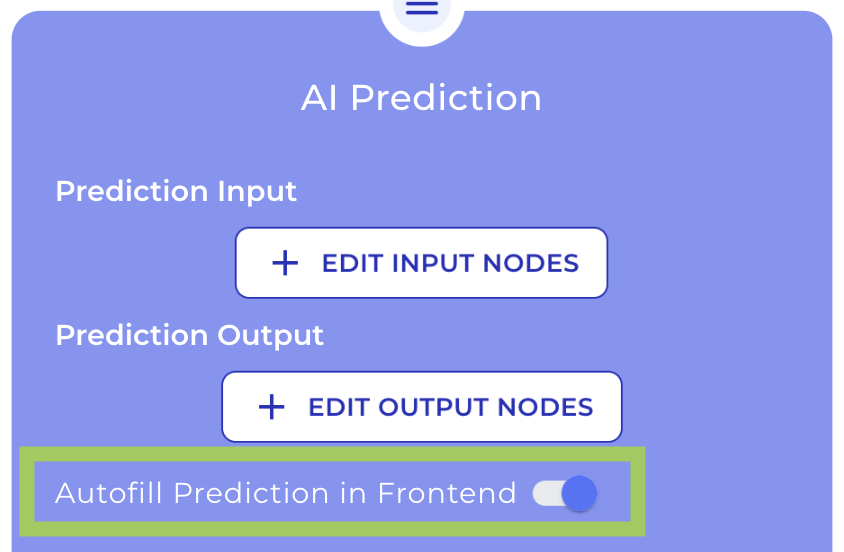
Step 4: Enabling Autofill
Toggle the Autofill switch to control how clients interact with predicted results – either automatically filled in or manually selected by them.
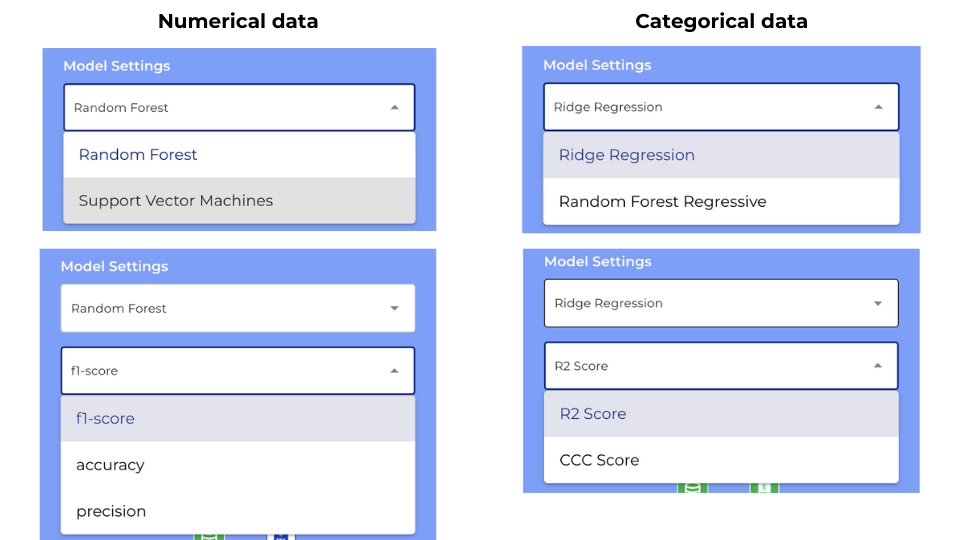
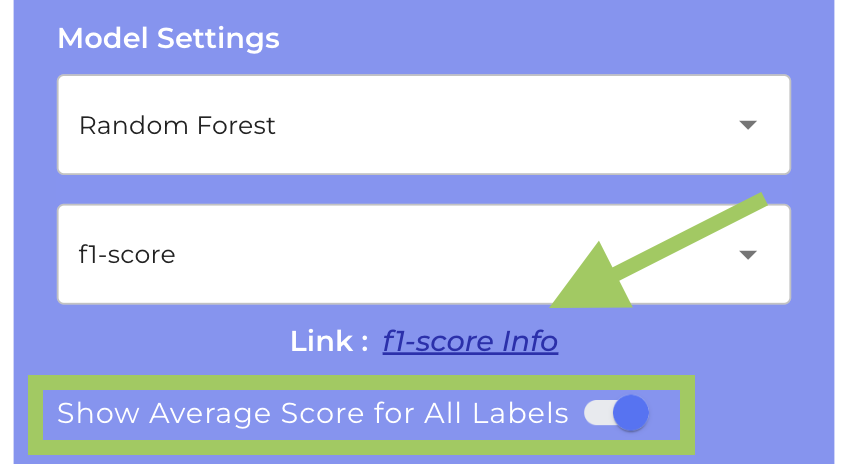
Step 5: Customizing Model Settings
Here, you’ll find two dropdowns to fine-tune your AI’s training parameters. The options vary based on the output node type. If you have a number node (numerical data), you will see different options than the ones for checkboxes and dropdown (categorical data). Confused about the settings? Don’t worry, a handy link beneath the dropdowns provides explanations to help you make the best choice.
Additionally, if your data is numerical, you will be able to select if you want to enable the option “Show Average Score for All Labels” or not.
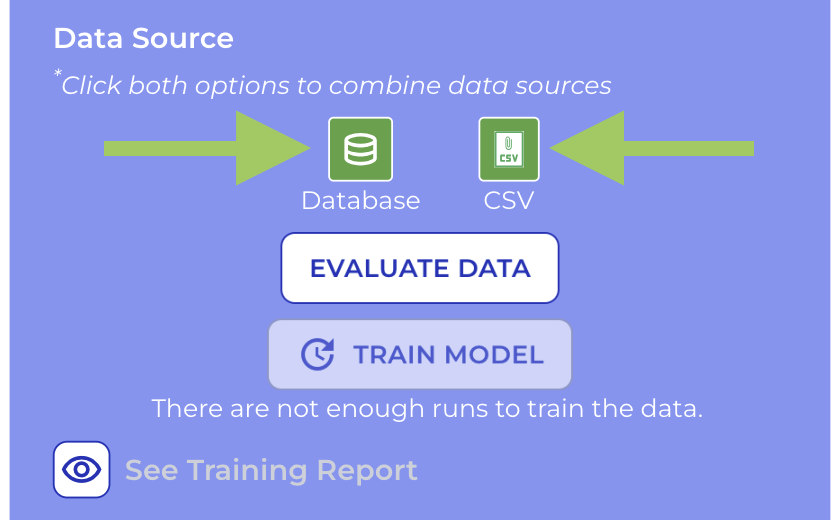
Step 6: Choosing Data Sources
On the next section of the node you can choose the way you want to train your AI.
– If you want the AI to be trained by data provided from your clients, then click to activate “Database” option. It will be activated when it’s green.
With this option, you will need to wait until you get certain amount of input data from your clients in the database before training the AI. When there are enough data, then the training option for your bot will be available.
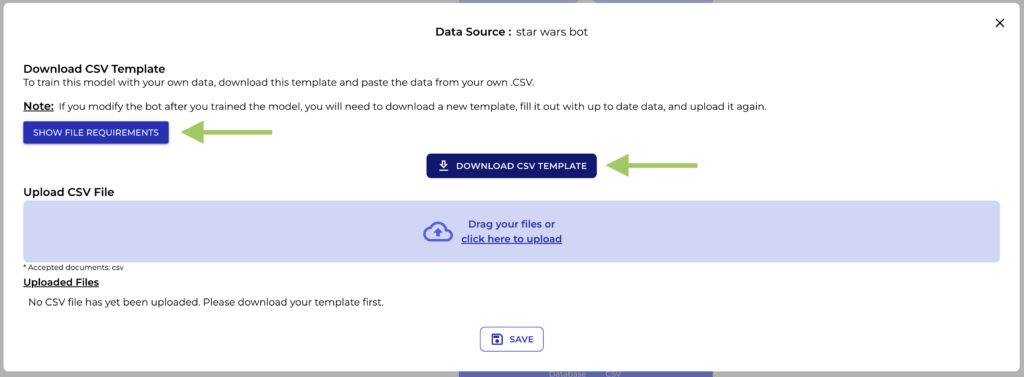
– If you prefer to provide your own data in a .CSV file to train the AI, then, click over “.CSV” button. It will get activated and a modal will be opened to guide you through the requirements that your .CSV must meet and to upload it to initiate the training.
The next step involves transferring data from our existing Excel file to the .csv template. There are some requirements this .csv must meet. You can watch a video tutorial about how to create the .csv file appropriately by clicking on “Show File Requirements”.
You can even blend both sources if you wish. And to deselect any of them, you just need to click over when it’s green and will change to white and blue, that means that option is not longer active.
Step 6: Uploading Your CSV
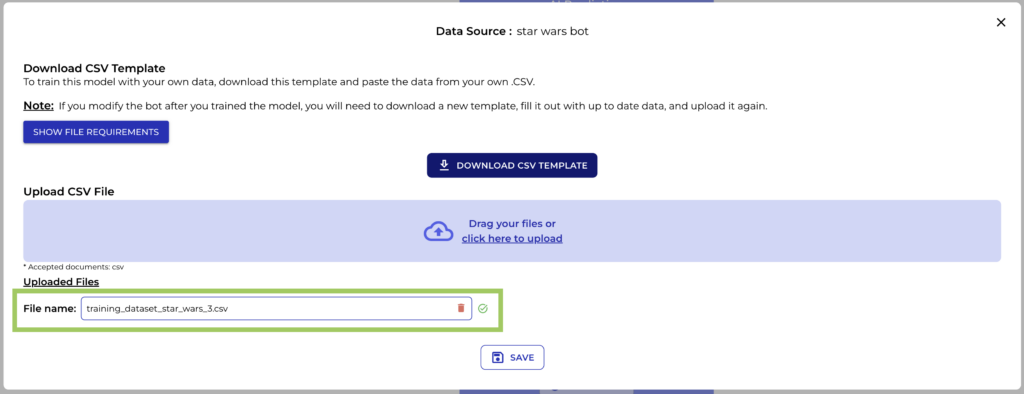
Once the template is filled up and you’ve confirmed it meets all requirements, it’s time to upload the CSV. This step finalizes the preparation of your dataset for AI training in the legal tech field.
When you .csv file is uploaded correctly, you will see a green icon confirming that all is good. If something needs to be fixed in your .csv like an extra space, or a missing value, then you will see a red icon and an error message that will indicate the error.
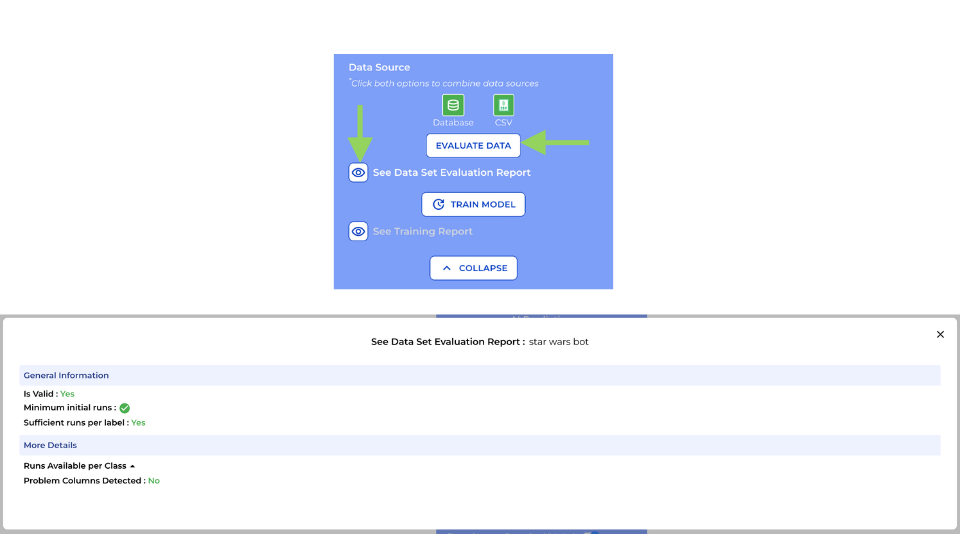
Step 7: Evaluating Your Data
Hit “evaluate data” to confirm your dataset’s readiness. The “See Data Set Evaluation Report” button provides a detailed review highlighting any training barriers.
If you training data is not valid, evaluation report will show you why. You’ll need to do something about it otherwise train button will not be enabled.
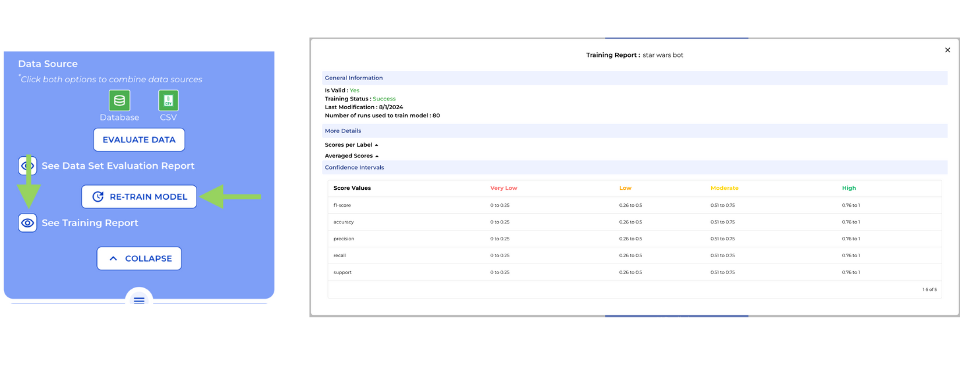
Step 8: Launching AI Training
With your data set primed, initiate the AI training by clicking on “Train model” button.
Post-training, you can retrain with additional data if needed. Don’t forget to check the “See training report” for insights into your AI’s learning journey.
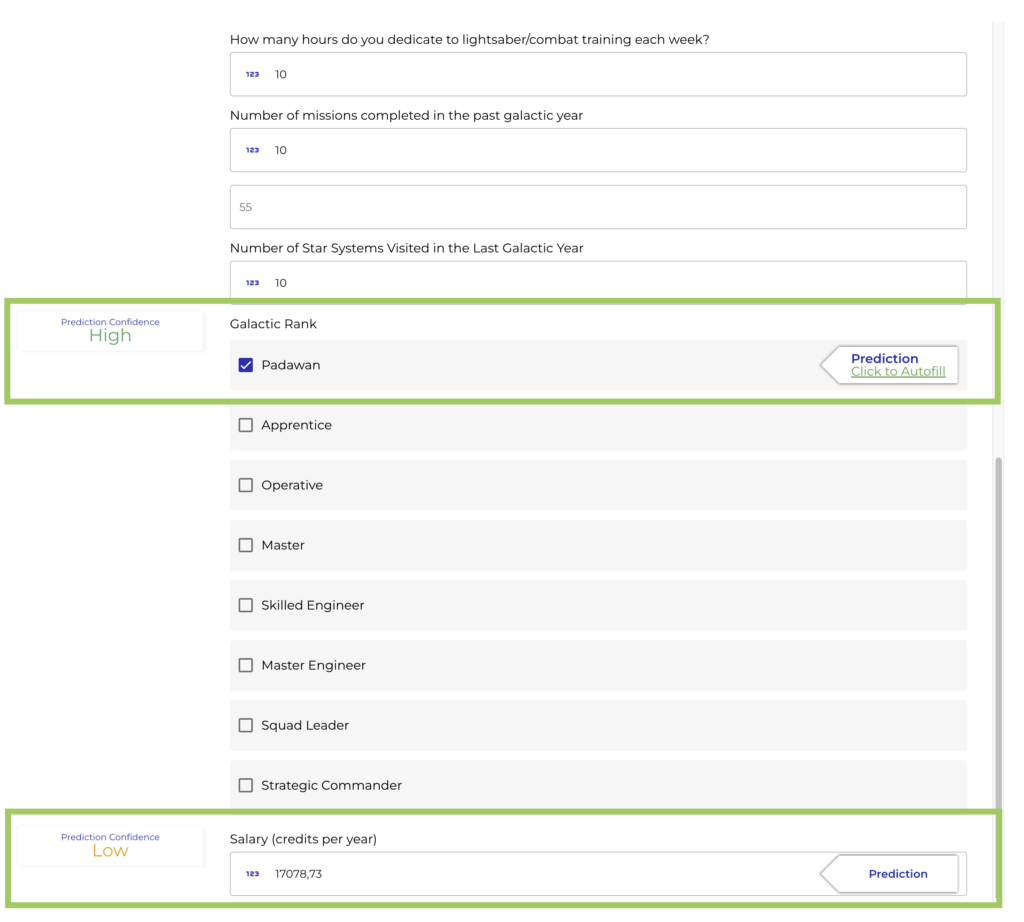
Step 9: Previewing Your Bot
Finally, preview your bot to see how it performs. The AI’s predicted labels will appear alongside your selected output nodes. When competing the form, different confidence values will appear for these labels, they are based on the data we have used to test our AI after it was trained.
Additionally, on each predicted option, there is a label with an autofill option, that your client can click to select the predicted answer.
That’s it! You’re now equipped to revolutionize your legal bot with AI-driven predictions. Happy automating!”