In this tutorial, we’ll go through the creation of AI settings for your bots. These settings are critical in determining how your AI interprets and processes data. Follow along as we break down each step.
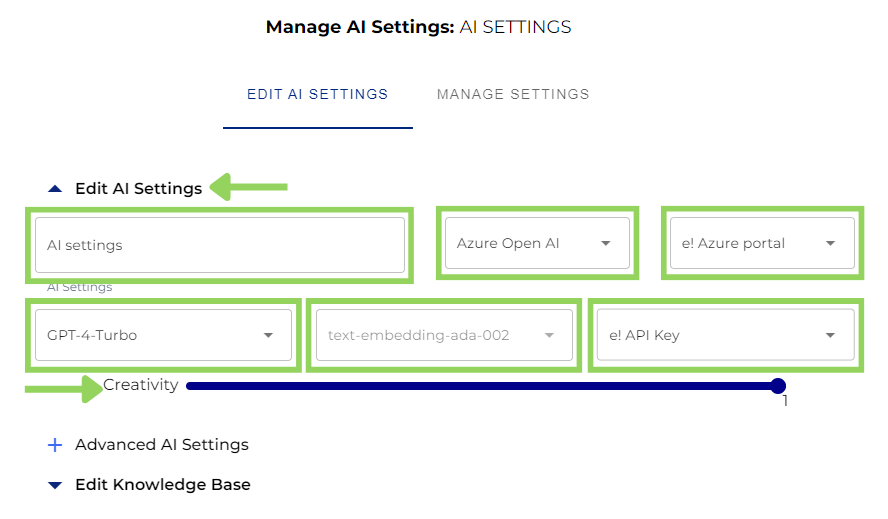
Step 1: Crafting Your AI Setting
Let’s delve into the initial setup of your bot’s AI. Here are the key parameters to configure:
- Naming Your AI Setting: Give your AI setting a unique name for easy identification.
- Selecting Your Provider: Choose between Open AI and Azure Open AI from the dropdown menu.
- Picking a Portal: Depending on your provider, the portal will either be preset for Open AI or offer multiple options for Azure Open AI.
- Choosing Your AI Model: Select from various AI models available for Open AI or Azure Open AI.
- Selecting Embedding Model: The embedding model will either auto-fill or offer a choice based on your previous selections.
- API Key Selection: Use the default API key, or create a custom one from your account.
Step 2: Setting AI Creativity
Just like human creativity, AI can also be ‘creative’. Adjust this parameter between 0 and 1 to fine-tune the AI’s level of experimentation with data, enabling it to generate new ideas and approaches.
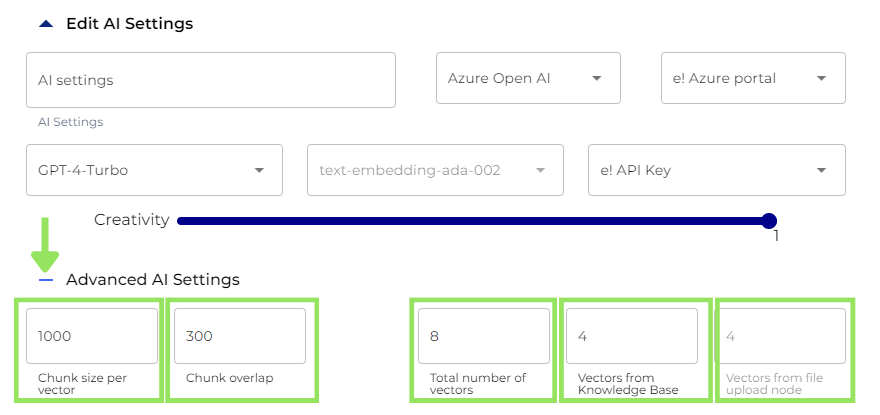
Step 3: Create Advance AI Settings
In this section, you can customise advanced settings related to the AI’s data handling and response generation. These settings enable precise control over the storage of information in the Vector Store and influence how the AI utilises this data for decision-making and response formulation.
- Chunk size per vector: This setting defines the number of characters each data segment (vector) should contain when content is being uploaded to the vector store. Adjusting the chunk size allows you to find the right balance between necessary and sufficient context for both similarity search and AI’s response formulation.
- Chunk overlap: It’s the number of characters that consecutive chunks share (common information). This ensures continuity and context. It’s important for maintaining connections between vectors, balancing the need of accuracy with efficiency.
- Total Number of Vectors: This field specifies the aggregate limit for vectors pulled from the vector store. Setting allows to ensure that AI model has a comprehensive, yet focused, set of data for effective predictions. This number goes from 1 to a maximum limit, ensuring that the capacity of the selected AI model is not exceed.
- Vectors from Knowledge Base: specifies the quantity of vectors retrieved from the bot’s knowledge base. It plays a crucial role in balancing the data sources for the AI’s predictive analysis by determining the influence of pre-existing knowledge base versus newly uploaded information.
- Vectors from file upload node: This field indicates the specific count of vectors extracted from files uploaded through the file upload node. It is dynamically calculated by subtracting the ‘Number of Vectors from the Knowledge Base’ from the ‘Total Number of Vectors.’ Therefore, any changes made to the ‘Number of Vectors from the File Upload Node’ or the ‘Total Number of Vectors’ will automatically adjust this number, ensuring a balanced and effective distribution of vectors for the AI’s analysis.
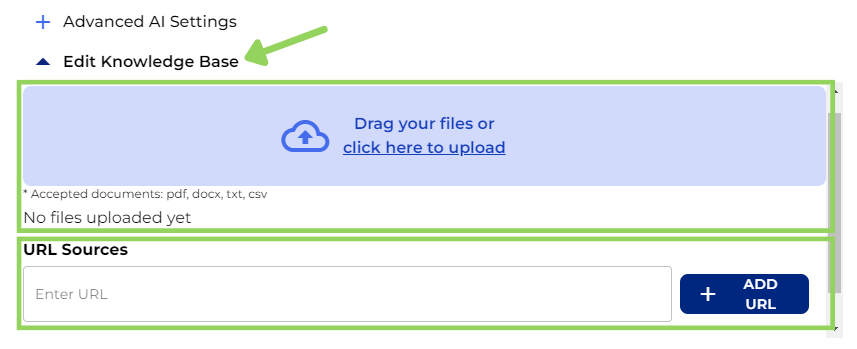
Step 4: Building Your Knowledge Base
Once the AI settings are created, if your bot requires it, you can create your own knowledge base, this means that the AI can extract information from the data you provided to the AI. To do this, you can upload your own documents with the relevant information, add Urls that you wish, or event combine both options.
Once you have added the relevant information for your knowledge base, just click save setting.
If you later need to modify or delete an existing AI Setting, just click on the Manage Settings tab. Look for the specific AI settings and click the bin button to delete your AI setting or the pencil button to modify the AI setting, but don’t forget to save the changes.
And there you have it! With these steps, you can create a personalized AI setting for your bot. Happy automating!